WordPress has been powering my blog since the start of last year. In fact, migrating my Jekyll template to WordPress was one of the highlights of my new year 2021 and I’m very happy that I did, although I didn’t publish as much as I had hoped for. Fortunately, I’ve learned a lot more about WordPress over the course of a year than when I started. In this short primer, I hope to go into a bit more depth on how to securely run a self hosted WordPress website.
Prerequisites
Before we get started, there are a few things that we need to make sure we have to
- Self hosted WordPress installation with SSH access
- Administrator account to set up plugins
Table of contents
- Keep plugins to the minimum and up to date
- Fix file permissions
- Two-Factor Authentication
- Set up auto banning of failed logins
- Enable regular backups
- Disable XML-RPC
- Disable file editing in WordPress admin
- Use a Web Application Firewall
- Don’t forget the usual web security measures
1. Keep plugins to the minimum and up to date
I wish I could just sticky something like this on top of most of my articles, but most people trying to attack our websites don’t have the time or resources to develop and use 0days. They use existing exploits out in the wild and some of these exploits can be months old, if not more. WordPress core and plugin authors can only do so much more than promptly releasing patches for security vulnerabilities that they find.
So then it is up to us as site admins to make sure we patch as soon as is feasible. Having worked on many large codebases, I know automatic updating isn’t always possible or even desirable, but having an eye on the changelog can definitely help not get compromised.
I’d also recommend a web security helper plugin that sends alert emails when it detects outdated plugins / themes / core.
2. Fix file permissions
During development, many files and directories permissions are way too open to make it easy to set up the website and all plugins. In production, however, the permissions can be dialed down a notch to prevent anyone with any access on the server to take over the whole website.
Similarly, attackers typically upload shell code using the uploads functionality, and if code execution is disabled in the directory, we make it harder for this attack to succeed.
A detailed guide on setting file permissions can be found on official WordPress documentation: https://wordpress.org/support/article/changing-file-permissions/
3. Two-Factor Authentication
Administrator accounts have many powers on a WordPress website, and a compromised administrator account can lead to uploading of PHP shell code leading to command execution and server compromise.
To make sure admin accounts are extra secure, enforce 2FA on all administrator accounts. This can be done by any 2FA or login security plugin on the WordPress plugin store.
4. Set up auto banning of failed logins
Since WordPress doesn’t ship with any builtin way of auto-banning failed login attempts, we have to rely on plugins like WordFence. WordFence will need to be configured with options to block login attempts after a certain number of failed attempts.
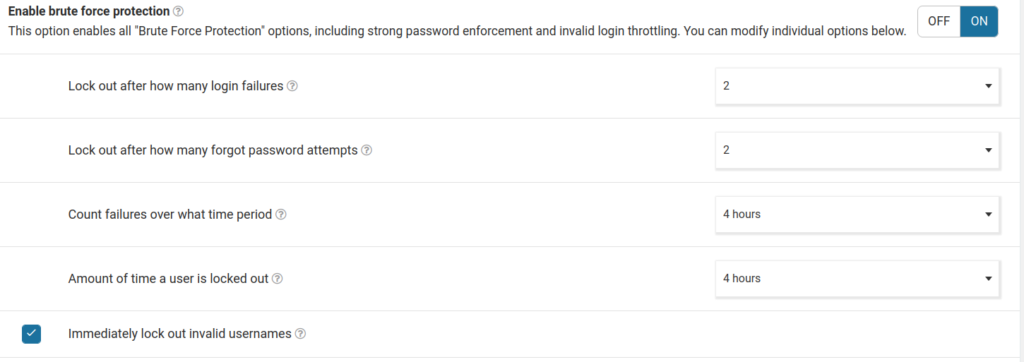
WordFence can also help you disable execution in upload directories, block IP addresses making malicious requests and much more.
5. Enable regular backups
While we can take preventive measures against mishaps, we can never be sure. Hence it is imperative that the website is backed up regularly. Backing up can be done at multiple places. The database can be backed up separately from the static assets and files. There are many plugins, like WPVivid, that help you fine tune what gets backed up and where it gets stored. It is always nice if you can afford an external backup location, like AWS S3.
The hosting provider might also have ways of backing up the website. For example, AWS Lightsail has daily instance snapshots which backs up the entire disk.
6. Disable XML-RPC
If you don’t use plugins that rely on XML-RPC or using the WordPress mobile app, it is wise to disable XML-RPC which removes another widely used attack surface by attackers. Many plugins allow the disabling of XML-RPC, including the aforementioned WordFence.
7. Disable file editing in WordPress admin
Disable editing of files from WordPress admin as that’s almost never a good idea, especially if you can achieve the same using more secure methods like SSH. To disable file editor, simply add
define( 'DISALLOW_FILE_EDIT', true );
to your wp-config.php file.
8. Use a Web Application Firewall
A firewall plugin like Sucuri or WordFence can identify attack signatures and block malicious requests. Many also include IP address block lists that prevent known malicious IP addresses from reaching your WordPress website.
For more control, there’s ModSecurity. ModSecurity needs to be installed alongside the web server and it can detect and block known attack signatures for not just WordPress but just about any popular web framework. It does require a deeper technical know how to setup and maintain ModSecurity, and a plugin might work be a better approach for most people.
9. Don’t forget the usual web security measures
A WordPress website is, at the end of it all, a website. While there are WordPress specific ways of hardening a WordPress installation, there is also a whole plethora of best practices that apply to every website, including the WordPress ones.
- Use HTTPS – SSL/TLS certificates are free, and usually come by default with many hosting providers and CDNs. Don’t forget to turn it on and enforce it in strict mode.
- Use appropriate security headers – Headers tell the browser how to handle your website’s content. Many client side attacks can be mitigated by using the right set of headers. A detailed list of useful headers can be found on OWASP’s website: https://owasp.org/www-project-secure-headers
- Use CAPTCHA on login page – to prevent bot submissions and more sophisticated bruteforce attacks, enforce a CAPTCHA like reCaptcha on login page. WordFence supports this out of the box (needs an API key from Google).
- Handle user input with care when using a custom theme – when using a custom theme that accepts user input in the form of query parameters to show filtered content, the regular best practices around user generated input has to be followed. Embedding user input in output can lead to Cross Site Scripting, while passing it straight to the database can lead to SQL Injection.
In conclusion
I hope that was useful. If you have any questions around WordPress or suggestions to improve this article, feel free to reach out to me via email. Thank you for reading!